In this Arduino basics we try to understand the code implementation procedure wherein an external analogue signal is fed to the Arduino analogue input and translated or converted into a correspondingly proportionate digital readout. Here we employ a variable resistance in the form of a pot as the analogue signal source.
Analog Read Serial
In this example we learn the method of reading an analogue input from an external device such a potentiometer, which is a n electro-mechanical device designed for implementing a varying resistance in a circuit through manual operation.
An Arduino can be used for measuring the magnitude of voltage coming out from a potentiometer in order to read and identifying its correspondingly varying resistance. This can be done by feeding the voltage into the Arduino analogue input port as an analogue value.
Here we'll see how the above is enforced after establishing serial communication across the Arduino and the linked computer.
Hardware Required
Arduino Board
10-kilohm Potentiometer
Circuit
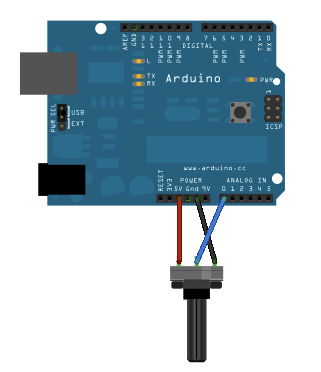
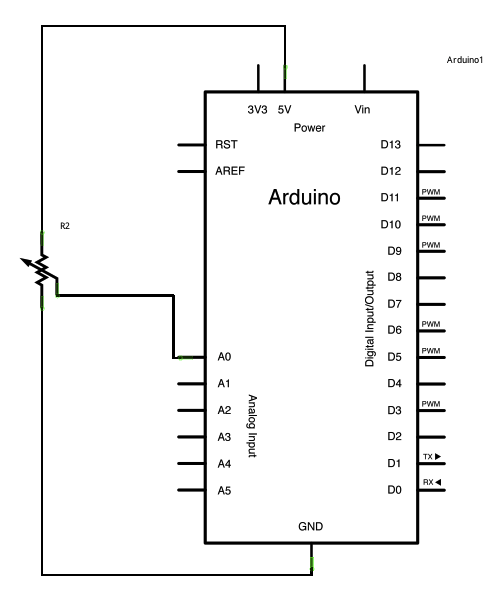
As depicted in the diagram above, hook up the three wires coming out from the pot to your Arduino ports.
Wire from one of the outer leads of the pot is assigned with the ground or the negative line of the board.
The other free extreme outer end lead gets connected with the +5V of the board.
What is left is the center lead of the pot, which gets terminated to the analogue input of the Arduino board.
When the pot shaft is rotated, the resistance across the center lead and the outer terminal shift from higher to lower and vice versa depending upon which side the slider arm gets closer to.
For example when the slider arm is rotated toward the +5V lead, the center lead gets closer to 5V and tends to acquire the whole value as it touches the 5V assigned lead. Similarly when the slider shaft is moved toward the ground pot lead, the center lead tends to attain a zero potential.
The above linearly varying supply voltage over the center lead of the pot is read by the arduino analogue input for interpreting it into a correspondingly varying resistance of the pot.
The Arduino encloses an internal analogue-to-digital converter circuitry which effectively interprets the above pot movement and converts it into numbers between 0 and 1023.
A particular position over the pot shaft results in a proportional number between 0 and 1023 being translated by the Arduino, and for the end values of 5V and zero volts, the interpretations are obviously 0 and 1023.
Code
In the referred program the setup function solely needs to be triggered for initiating serial communications, the rate being 9600 bits of data per second, across your Arduino board and the computer.
The expected command is in the form:
Serial.begin(9600);
Subsequently, in the main loop of your code, we enforce a variable in order to fix the resistance value (which would be as discussed between 0 and 1023, just suitable for an int data type) received from the pot leads:
int sensorValue = analogRead(A0);
To conclude, print this information to your serial window as a decimal (DEC) value. You can use the command Serial.println() for implementing this in the last line of code:
Serial.println(sensorValue, DEC)
After this, whenever Serial Monitor is initiated in the Arduino development domain (this is done by clicking the button that's immediately at the right hand side of the "Upload" button in the header of the program), we would see a consistent chain of digits running from 0-1023, corresponding to the varying rotational position of the pot shaft. If we stop the rotation of the pot shaft at some instant, the corresponding instantaneous number will get displayed on the screen of the Arduino, this would again change proportionately as we go on changing the pot shaft position.
The Code
/*
AnalogReadSerial
Reads an analog input on pin 0, prints the result to the serial monitor.
Attach the center pin of a potentiometer to pin A0, and the outside pins to +5V and ground.
This example code is in the public domain.
*/
// the setup routine runs once when you press reset:
void setup() {
// initialize serial communication at 9600 bits per second:
Serial.begin(9600);
}
// the loop routine runs over and over again forever:
void loop() {
// read the input on analog pin 0:
int sensorValue = analogRead(A0);
// print out the value you read:
Serial.println(sensorValue);
delay(1); // delay in between reads for stability
}
0 Response to "Converting Analogue to Digital (Analogue Read Serial) - Arduino Basics"
Posting Komentar